# Get Started
# How dApp Works in Vite
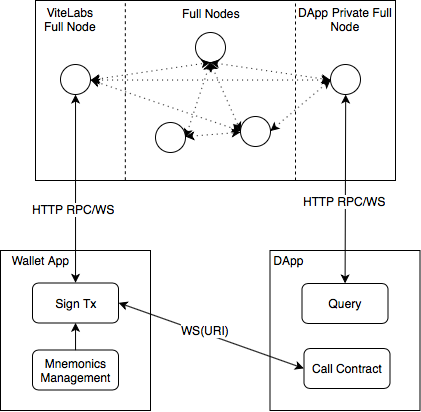
Above diagram shows how dApp works in Vite. In general, a dApp consists of one (or several) smart contract and companion web application. dApp communicates to a full node (private or non-private) via HTTP or WebSocket connection, fetches data from blockchain and then displays on the webpage. Usually dApp doesn't manage private keys and addresses. Instead, a dApp establishes a connection to Vite wallet (where mnemonic seed and private keys are managed) for sending/receiving transactions, calling smart contract deployed on blockchain, etc. To set up the connection between dApp and Vite wallet, at present there are three options.
- Scan a QR code on the dApp by using Vite wallet for every transaction;
- Integrate the dApp into Vite wallet;
- Use ViteConnect.
The first option is not good enough because you have to scan QR code each time you send transaction or call smart contract. It only applies to very simple dApp where user should only talk to smart contract once! A simple voting program could be an example of this case.
Integrating dApp into Vite wallet is a good choice once you got approval from Vite team, so that you have a place for your dApp in Vite wallet! So far so good! However, you need request first and there is no guarantee that it must be approved.
We recommend ViteConnect. ViteConnect establishes WebSocket connection between dApp and Vite wallet. More safe, and more convenient. User just need scan QR code once and the subsequent transactions can be auto-signed (if you turn on the switch). For how to incorporate ViteConnect into your dApp, see Vite Connect SDK (opens new window).
# dApp Release Process
- Complete dApp (smart contract and companion web application) development and testing;
- Set up a full node that provides both HTTP and WebSocket RPC services;
- Deploy smart contract on blockchain and stake VITE coins for the contract's account to make sure it has enough quota;
- Deploy companion web application;
- Test dApp's functionalities to make sure it works well. If it should integrate with Vite wallet, test in Vite Test Wallet.
# Before Development
# Run Local Dev Node
See Run Local Development Node to install your local development node.
# Install Vite.js
Install the latest release of Vite.js. Vite.js is the Javascript SDK provided by Vite team.
# Download solppc
Download the latest Solidity++ compiler at solppc Releases (opens new window)
# Install Test Wallet (optional)
Setup Vite Test Wallet to connect to your development node.
# Debug Contract
Install VSCode IDE and Soliditypp Extension Plugin at https://code.visualstudio.com (opens new window). Follow This Guide to write and debug your smart contract in VSCode IDE.
# Deploy Contract
We suggest to deploy smart contract through Vite.js SDK.
Quota Required
Do not forget to get some quota for your contract by staking.
Now let's see an example. The following code presents a simple HelloWorld contract.
Compile the contract by running the following command. Now we get contract's ABI and binary code.
Tips
ABI and binary code can also be generated in the IDE.
Now deploy the contract through a node. Below Javascript code shows how to deploy smart contract and obtain quota using Vite.js:
To verify a deployed smart contract, use Contract Query API. If the returned summary has binary code contained, the contract is successfully deployed.
# Call Contract
In above example, the smart contract we deployed has one function SayHello(address addr), which accepts an address parameter. Let's call it.
# Remote Signing Library
In most cases, dApp should not manage private keys and mnemonics, which, for safety reasons, should always be stored in user's Vite wallet. Therefore, how dApp calls up Vite wallet and sends transactions through becomes the real concern. How is it addressed in Vite?
We provide two libraries.
- @vite/bridge (opens new window)
Vite Bridge is recommended for dApps that are integrated into Vite wallet. Through Vite Bridge client SDK, you are able to- Obtain current user's Vite address within web application, and
- Send transaction or call smart contract from web application.
Important
If your dApp is not to be integrated with Vite wallet app. Do NOT use Vite Bridge.
Let's see an example of sending 1 VITE to a second address.
Here below is another example of calling a smart contract.
To learn more about Vite Bridge, access our source code on Github (opens new window).
- @vite/connector (opens new window)
Vite Connect is the recommended solution for signing transactions for dApps that are not hosted in Vite wallet. At present the following features are supported
- Establish connection sessions from Vite wallet to dApp by scanning QR code displayed on dApp's web page
- Connection is retained for the whole session until disconnected
- Transactions triggered on dApp are signed and sent out through Vite wallet app, not on dApp
- Once enabled, transactions can be auto-signed
Recommended
Vite Connect is the general remote signing solution for all dApps that will not be integrated into Vite Wallet.
Let's see a piece of code that defines how Vite Connect should be setup in Javascript client.
To learn more about Vite Connect, access our source code on Github (opens new window).
# Useful APIs
You may use the following APIs in your dApp.
# RPC Query API
| API | Description |
|---|---|
| ledger_getLatestAccountBlock | Get the latest transaction of the specified account |
| ledger_getAccountInfoByAddress | Get account summary by address, including chain height, balances, etc. |
| ledger_getAccountBlocksByAddress | Get transaction list of the specified account |
| ledger_getAccountBlockByHeight | Get transaction by block height |
| ledger_getAccountBlockByHash | Get transaction by hash |
| ledger_getVmLogs | Get smart contract execution logs by log hash |
| ledger_getUnreceivedTransactionSummaryByAddress | Get summary of unreceived transactions for the specified account |
| ledger_getUnreceivedBlocksByAddress | Get unreceived transaction list for the specified account |
| contract_getContractInfo | Get contract summary, including code, consensus group, etc. |
| contract_callOffChainMethod | Call contract's' off-chain method |
For API definitions for all RPC methods, please visit RPC API
To learn more abut calling RPC API in Vite.js, please visit Vite.js SDK
# Event Subscription
Event subscription is an advanced function that can be used in dApp to monitor state change of smart contract.
See Event Subscription and Subscription API for more information.
# FAQ
How to know smart contract execution result in time?
Since smart contract is executed asynchronously on Vite, you do not know execution result immediately after a request function call has been sent. You must get the execution info in the response transaction, which is performed a bit later according to various contract parameters and Vite network status.
One way to obtain execution result is polling
ledger_getAccountBlockByHashby your request transaction hash to see if it is received by smart contract. Another is to use event subscription.Once the request transaction is successfully received, you can check the 33th byte in data field of the response transaction.
0means execution succeeded while1stands for failure. Usually a failed execution may result fromREVERTinstruction in function call, insufficient quota of smart contract or insufficient balance upon transferring to 3rd account.Usually (depending on how your smart contract is written), some events were triggered during execution and saved in
logHashfield of the response transaction. Useledger_getVmLogsto get the events.